Version: 1.4
Authors:
- Adrian Szydlo
- Jake Farrell
Created: 31/01/2025
Last Modified: 21/02/2025
Table of Contents
- Table of Contents
- 1. Introduction
- 2. Creating an Account
- 3. Using the Community Board
- 4.0 Opening the Partner Matcher
- 5.0 Viewing Your Profile
- 6.0 Using the Chatbot
- 7.0 Accessing the Admin Dashboard
- 8. Appendices
1. Introduction
1.1 Overview
This user manual will help you navigate and understand all of the different features of CollegeGuide, a platform designed for students, by students to simplify college life by connecting students while providing them with an engaging and fun experience. In this manual, we will go over the major features of CollegeGuide, such as the Community Board, Project Partner Matcher, Chatbot and more!
1.1.1 Admin Account for Testing All Features
If you would like to test all of the features of CollegeGuide, you can use the following admin account to perform any actions that require extra permissions. This account has been set up with the following:
- Username: admin
- Password: 123
1.2 Accessing CollegeGuide
To open CollegeGuide, you can either install the application as outlined in our Technical Manual or visit our website at collegeguide.jakefarrell.ie. The website is designed to be accessed both on desktop and mobile devices.
On the website, you will be greeted with the CollegeGuide homepage which provides an introduction to CollegeGuide along with some current statistics. From here you can create a new account or if you are logged in already, view your community boards.
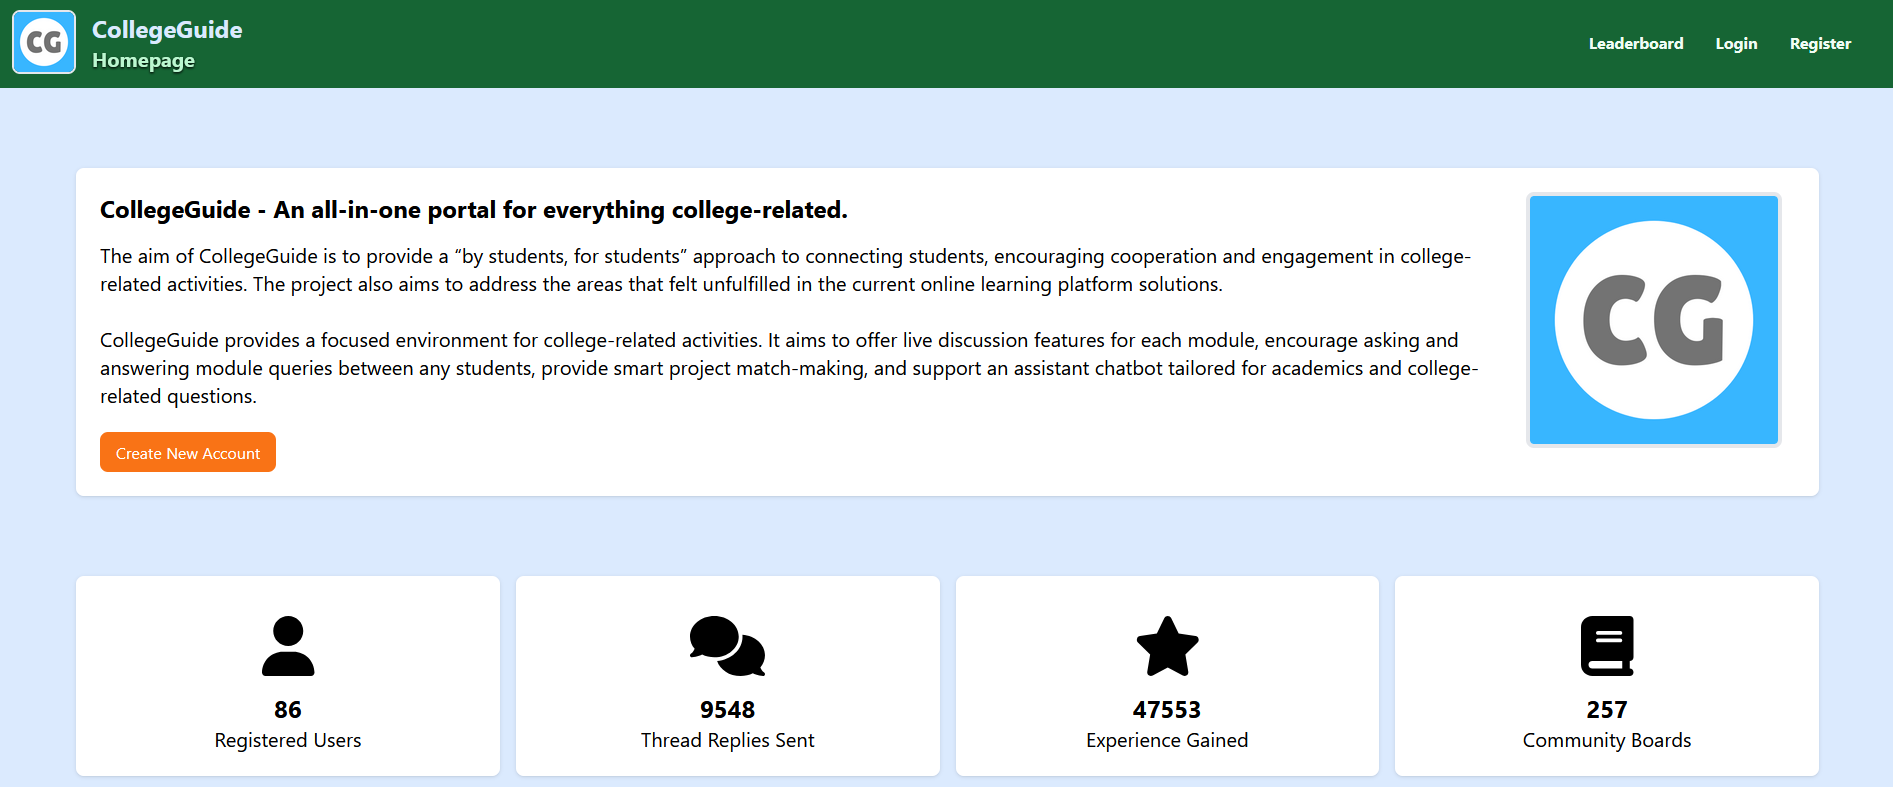
Figure 1: CollegeGuide Homepage
2. Creating an Account
2.1 Registering as a User
From the homepage, click on Create New Account and you will be brought to the register page. All users are required to register with their college email address along with a strong password. This is to support our for students, by students approach by ensuring that only students can access the platform.
CollegeGuide currently supports the following colleges:
- Dublin City University (@mail.dcu.ie)
Note: CollegeGuide supports multiple colleges. If you would like to see your college added, please contact the CollegeGuide admins.
2.1.1 Entering your Information
For the initial registration, you will need to enter the following information:
- Username: This must be unique and cannot be changed once you register.
- Email Address: This must be a supported college email address, which are outlined above.
- Password: This must be at least 10 characters long, include an uppercase letter, a lowercase letter, a number, and a special character.
Once you have entered this information correctly, click on Register new account and you will be sent an email to verify your email address.
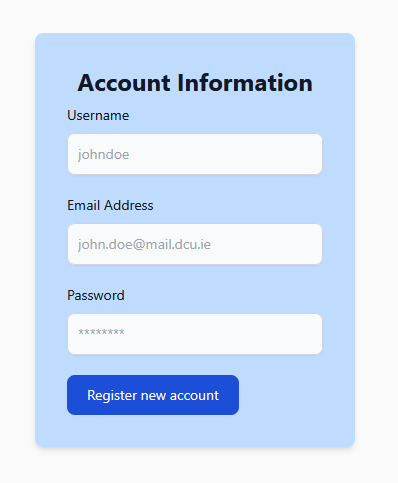
Figure 2: CollegeGuide Register Page
2.1.2 Verifying your College Email Address
After you register, you will be brought to a page where you can enter the eight-digit verification code sent the email address you provided, once you enter this correctly, you will be then asked to create your CollegeGuide profile.
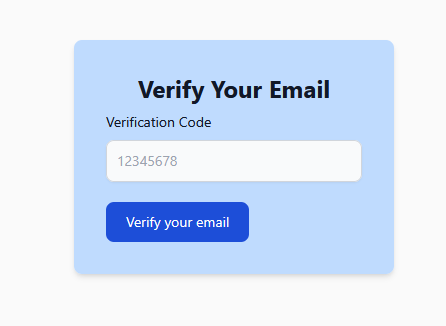
Figure 3: CollegeGuide Email Verification Page
2.2 Creating your Profile
Your CollegeGuide profile contains all of the information about you, your courses, interests and skills. After your profile is created, you can change your information at any time. See Editing Your Profile for more information.
Note: Due to the length of the registration form, it is split into three sections for your convenience. These will be outlined in sections 2.2.1, 2.2.2 and 2.2.3.
2.2.1 Entering Profile Information
The first step in creating your profile is to enter your basic information. This includes your full name, bio, profile picture and visibility. This information will be displayed on your profile page and can be viewed by other students, if you set your profile to public.
- Full Name (Required): Fill in your name how you would like it to be displayed on CollegeGuide.
- Bio (Optional): Write a small bio about yourself which is less than 256 characters. This can help other students get to know you better.
- Profile Picture (Optional): Choose a profile picture to display on Community Boards and your profile.
- Visibility (Required): Choose whether you want your profile to be publicly viewable or private.
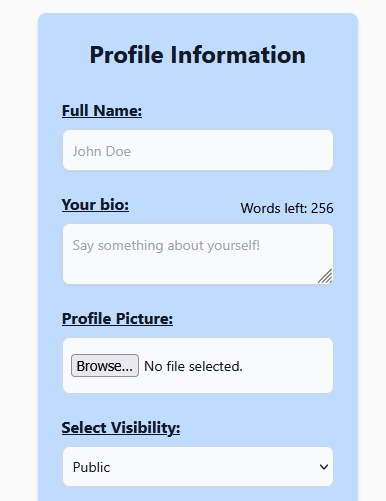
Figure 4: CollegeGuide Profile Information
2.2.2 Entering Your Interests, Preferred Roles and Skills
Entering your preferences is not only useful for helping students get to know you, it also helps the Project Partner Matcher to provide more relevant matches. For each of these sections, you can select up to 5 options that best reflect you as a student. You can leave this section blank if you wish, but it is encouraged to fill it out. Once you have selected the options that best reflect you, you can then move onto filling out your college course information.
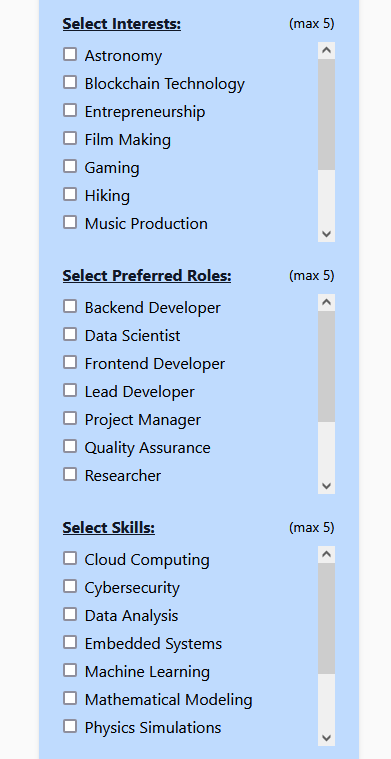
Figure 5: CollegeGuide Interests, Roles and Skills
2.2.3 Entering Course Information
This information will be used to configure CollegeGuide to your specific course layout and structure. There are three dropdown boxes that will automatically populate with the supported values once selected so please fill them out in order.
- College (Required)
- Programme (Required)
- Year (Required)
After you fill out the complete form and click on “Create new profile”, your data will be saved and you will be brought to the module boards page, tailored to your college course.
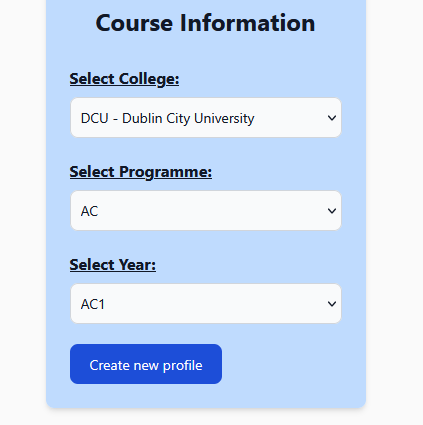
Figure 6: CollegeGuide Course Information
2.3 Logging In
If you have an existing account on College Guide, you can click on the login option on the Navbar which will redirect you to the login page. Here you can enter your existing username and password to access your account. Upon successful sign in, you will be sent to your community board selection page.
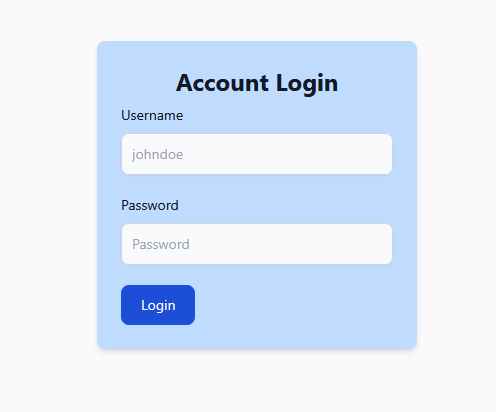
Figure 7: CollegeGuide Login Page
2.4 Viewing the Community Board Selection Page
Once you have either logged in or created your account, you will be sent to the Community Board Selection Page. This page allows you to see all the modules that are found in your programme. If you would like to search for a module not in your programme, you can use the search bar, which will filter from all of the modules registered on CollegeGuide.
Each module grouped by year and semester and is displayed in a card that has some basic module information, along with how active the community board is, showcasing the number of discussion threads, advice queries (grouped under posts), notes and partner matcher queues that are currently active for that module. Click on any of the modules to enter it’s respective Community Board.
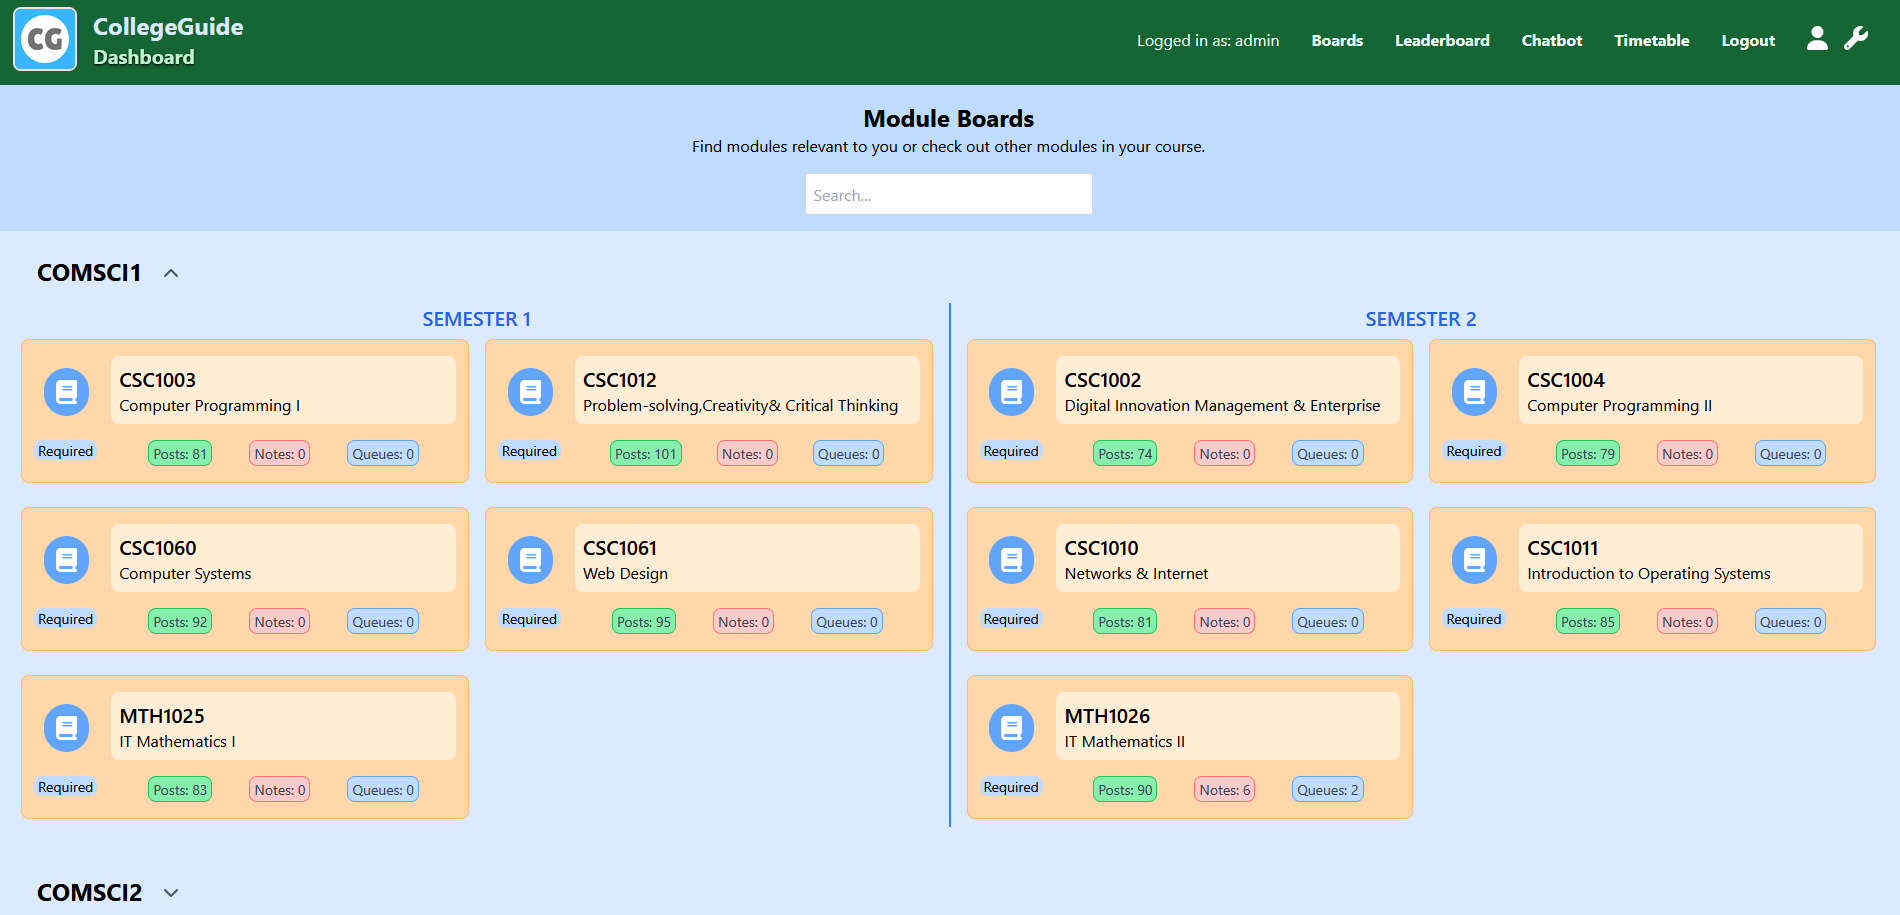
Figure 8: CollegeGuide Community Board Selection Page
3. Using the Community Board
3.1 What is the Community Board?
The Community Board is the main home of CollegeGuide, and is where you will spend most of your time interacting with other students. The community board is split into two main sections, the Board Banner and the Board Body.
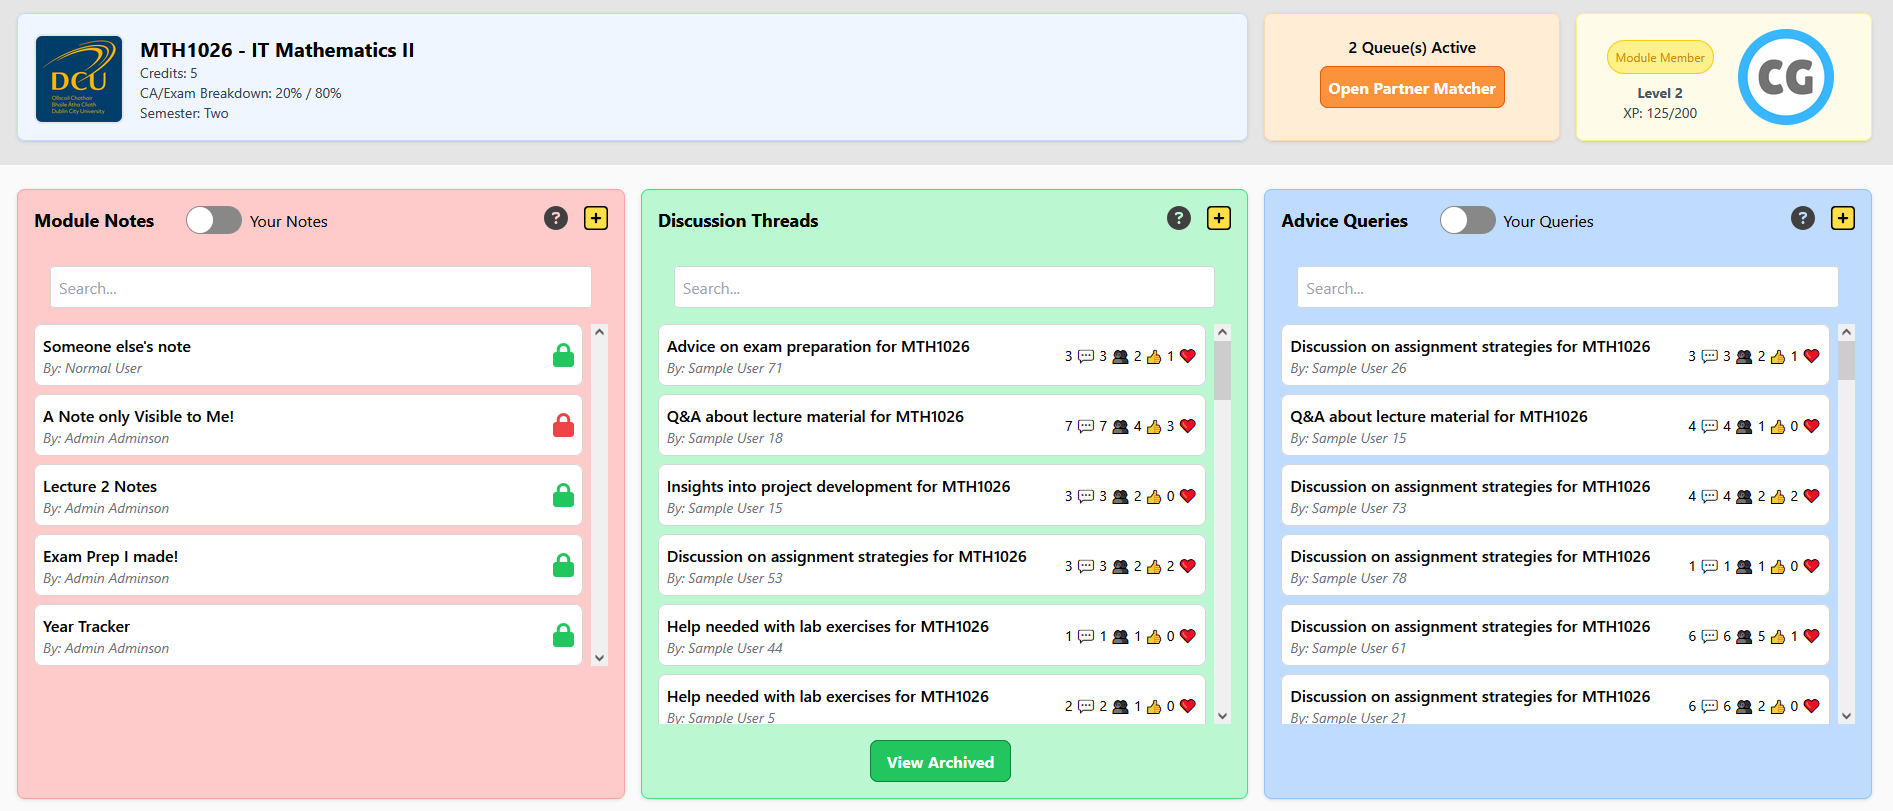
Figure 9: CollegeGuide Community Board
3.1.1 Board Banner
The Board Banner contains information about the module you are currently viewing, such as the module name and examination information. Your profile picture is displayed along with your role in the Community Board (Module Member or Visitor) and your current level and experience points. This area is where you can access the Partner Matcher, with the number of current active queues being shown.

Figure 10: CollegeGuide Community Board Banner
3.1.2 Board Body
The Board Body is itself divided up into three distinct areas, these are the Module Notes, Discussion Threads and Advice Queries.
-
Module Notes are where you can create and share notes relating to the module, these can be publicly visible or private and can be styled using either markdown syntax or our built-in formatter. You can filter by your own created notes or use the search bar to find something specific.
-
Discussion Threads are created by CollegeGuide Moderators for discussing the latest lecture, assignment info, or anything else relating to the module. You can reply to threads if you are currently taking the module and they are not archived. Once archived by a moderator, they can be viewed by clicking on the View Archived button.
-
Advice Queries are where you go if you are not currently taking the module, but either plan to in the future or are just curious about the content. You can ask questions about the module and get advice from other students who are currently taking it. You can filter by your own queries and unlike Discussion Threads, anyone can ask an advice query.
All three of these areas can be opened side by side, allowing you to take notes on an interesting topic you found in a discussion thread for example. You can also share your support for the content by using the thumbs up and heart icons.
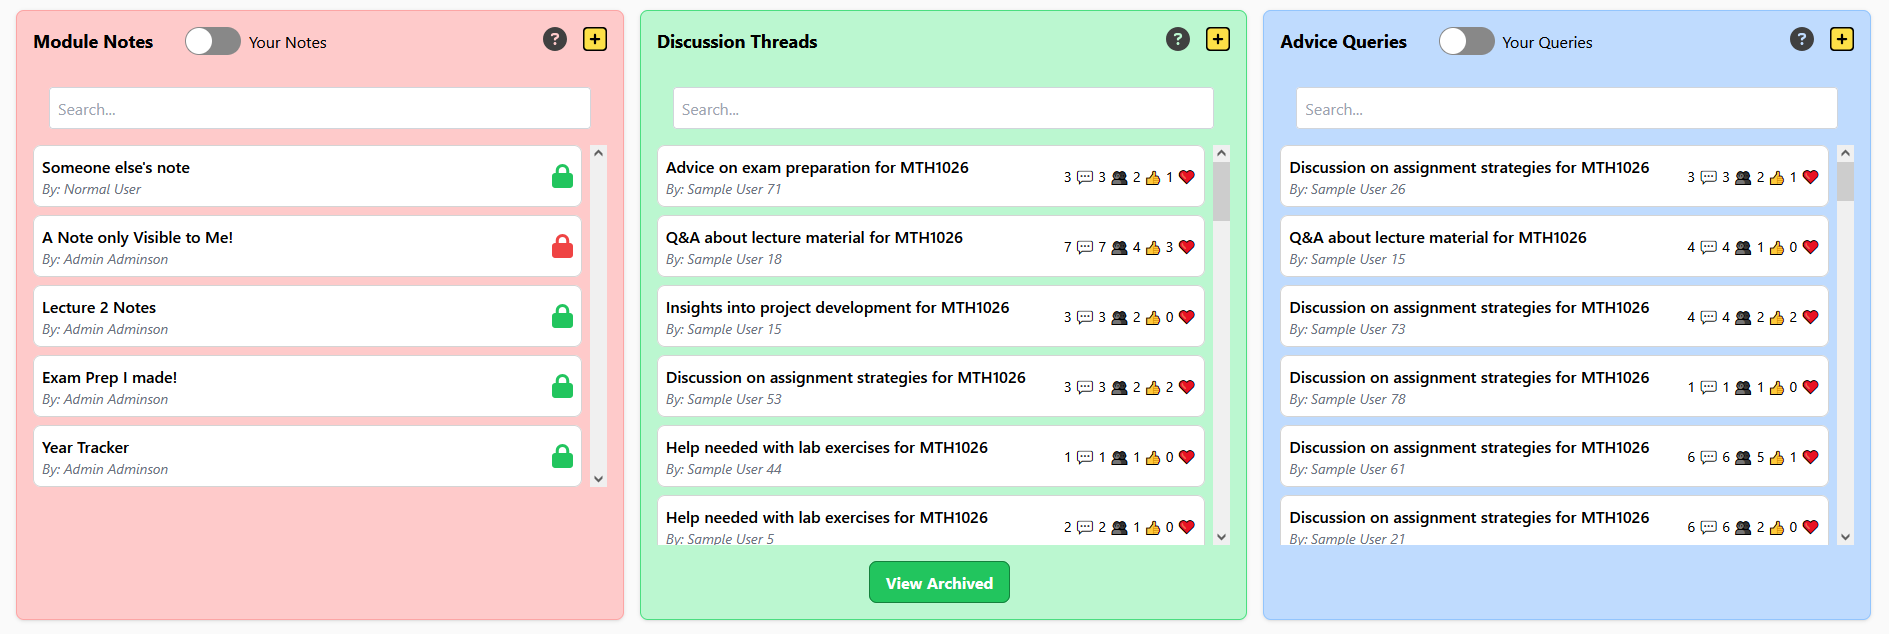
Figure 11: CollegeGuide Community Board Body
3.2 Creating and Editing Notes
To create a note, click on the yellow plus button on the top right of the Module Notes section. This will bring up a text box with some suggested formatting tools, if you would like to write more detailed notes, markdown-style syntax is also supported directly in the text box. Once you are happy with your note, give it a name and set it’s visibility. Public and private notes can be distinguished by the colour of the lock icon on the note preview.
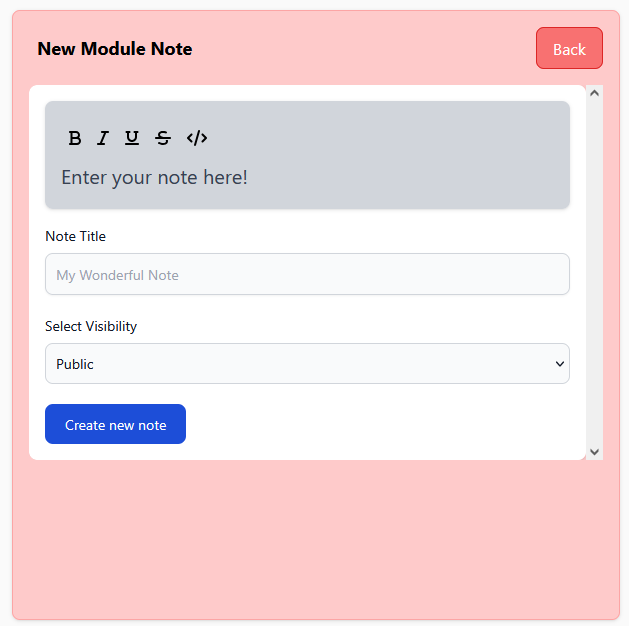
Figure 12: Creating a note on CollegeGuide
After creating your note, you will see it displayed in the Module Notes section. To edit your note, click into it and click on the edit note button, this will bring up the same text box as before, but this time with the content of your note.
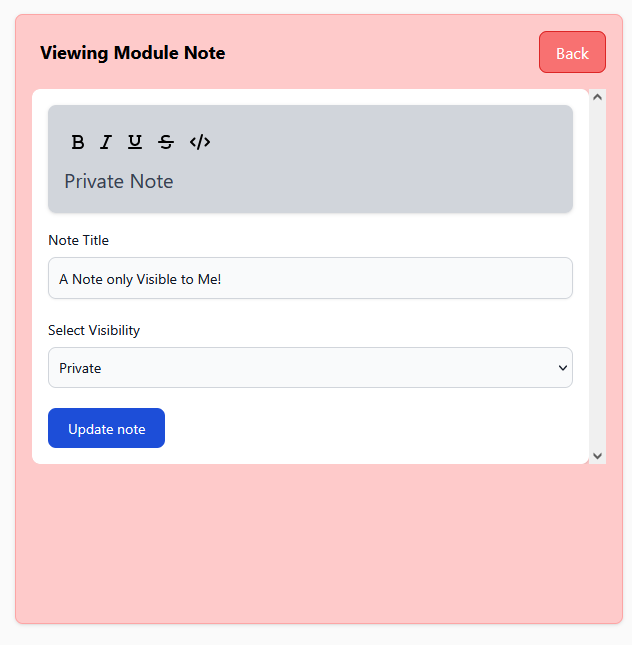
Figure 13: Editing a note on CollegeGuide
3.3 Creating Discussion Threads
If you are a CollegeGuide Moderator, you can start a new thread by clicking on the yellow plus button inside the discussion threads box. You need to give your thread a title, then optionally add the first reply. Once you’re happy, click on Create Post and you will be brought to the list of threads, with your newly created one being displayed at the top.

Figure 14: Creating a discussion thread on CollegeGuide
3.4 Replying to Discussion Threads
Want to discuss the latest lecture or assignment? Head over to the Discussion Threads section and check out all of the relevant threads. Once inside the thread, you can see all of the other student’s replies, and you can add your own by typing in the text box below.
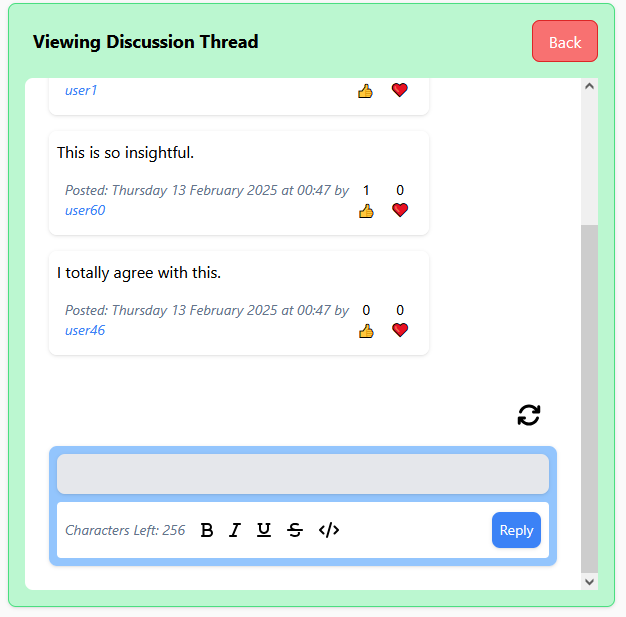
Figure 15: Replying to a discussion thread on CollegeGuide
3.5 Archiving Discussion Threads
If you are a Moderator / Class Representative, you can archive threads that are no longer relevant by clicking on the archive button inside the thread. This will remove the thread from the main view, but it can still be accessed by clicking on the View Archived button. Threads that are archived can no longer be commented on, but you can still react to them. Want to unarchive a thread? Click on the unarchive button inside the thread.
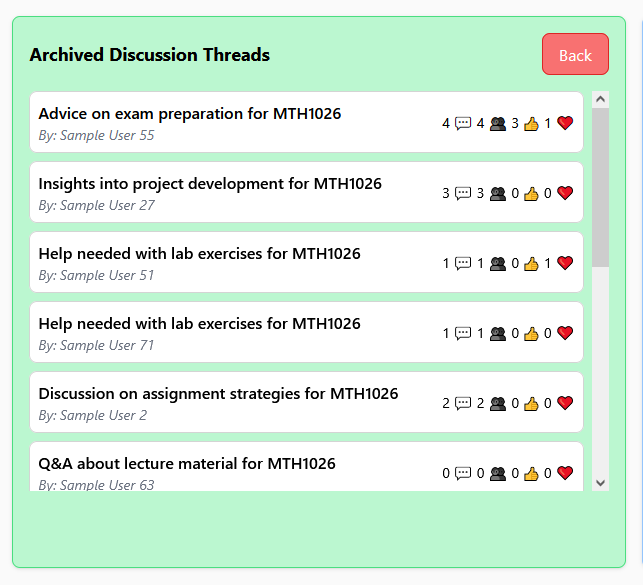
Figure 16: Archiving a discussion thread on CollegeGuide
3.6 Starting Advice Queries
Curious about what is covered in a particular module, want to decide whether you want to take an optional module next semester? Head over the advice queries section and click on the yellow plus button to start a new query. Enter your question along with a description and click “Create Post”. After posting you will see your new advice query displayed at the top of the advice queries section.
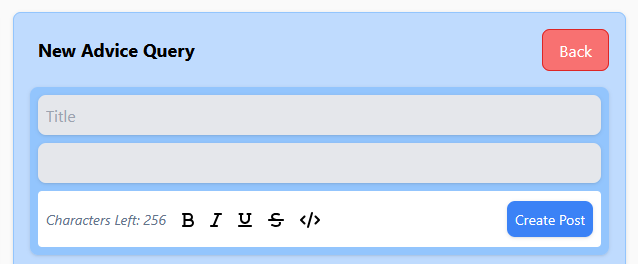
Figure 17: Creating an advice query on CollegeGuide
3.7 Replying to Advice Queries
Know the answer to a future student’s question? Click on their advice query and scroll down to where the text box is. Here you can type in your response and click “Reply”. The section will be refreshed and your reply will be added to the query thread.
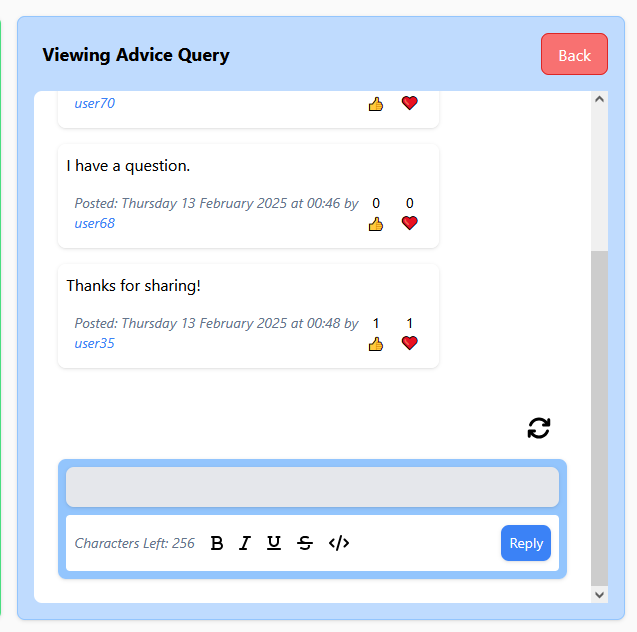
Figure 18: Replying to an advice query on CollegeGuide
3.8 Rewarding Other Users
Came across a note that cleared up your understanding of a topic or got some good advice from a reply to your advice queried? You can reward the creator by clicking on the thumbs up or heart icon depending on your preference. This will help highlight useful information and will add to the creator’s total rewards on their profile. You can also click the icon again if you change your mind.
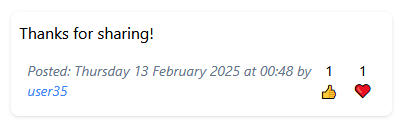
Figure 19: Rewarding users on CollegeGuide
3.9 The CollegeGuide Leveling System
Rewards & Experience Points are a core feature of CollegeGuide, which help to boost engagement and keep the Community Boards active. You can level up and gain experience by doing the following:
- Creating Notes
- Creating Discussion Threads
- Replying to Threads
- Creating Advice Queries
- Replying to Advice Queries
- Using the Chatbot
For each action, ten experience points will be added to your account (five for using the chatbot). Your experience and level can be checked at any time from your profile page.
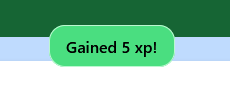
Figure 20: CollegeGuide Leveling System
4.0 Opening the Partner Matcher
From the Community Board Page, in the Board Banner, click on Open Partner Matcher, you will then be brought to the Partner Matcher interface.
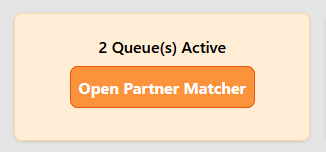
Figure 21: CollegeGuide Partner Matcher Button
4.1 Viewing Available Queues
Once you open the Partner Matcher, you will be greeted with a list of available queues that you can join. Each queue has a title, a description and a list of users who are currently waiting in the queue. You can view the user’s profiles if they are set to public from here too!.
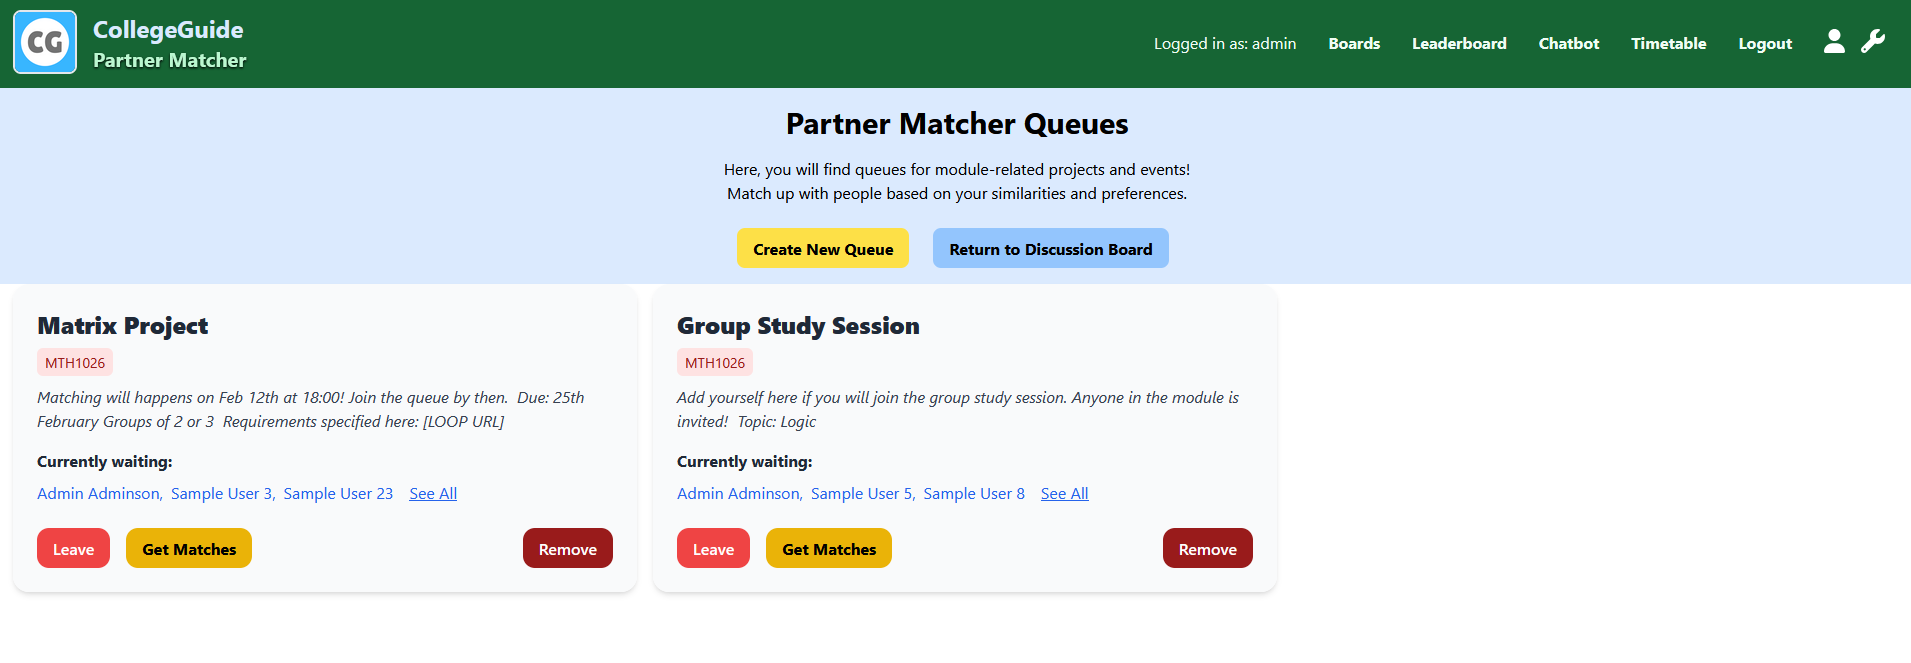
Figure 22: CollegeGuide Partner Matcher
4.2 Creating or Removing Queues
CollegeGuide Moderators can create new queues by pressing Create New Queue from the Partner Matcher interface. This will bring up a form where you can enter the queue title, description and the deadline for automatic matching. Once you have filled out the form, click on Create Queue and the queue will be added to the list.
Once a queue has been created, CollegeGuide Moderators can remove it at any time by clicking on the Remove button.
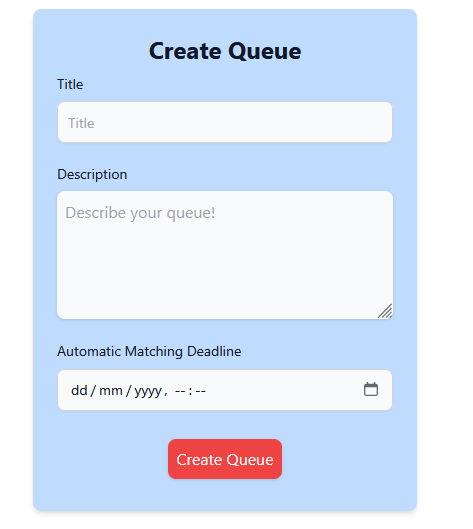
Figure 23: Creating a new queue on CollegeGuide
4.3 Joining Queues and Getting Matches
If you would like to join a specific queue, click on Join from the Partner Matcher interface. Once in, your name will be added to the currently waiting list. To get your matches, click on Get Matches and the Partner Matcher will automatically match you with the three best possible matches based on weights. You can then view their profiles, along with their overall compatibility rating.
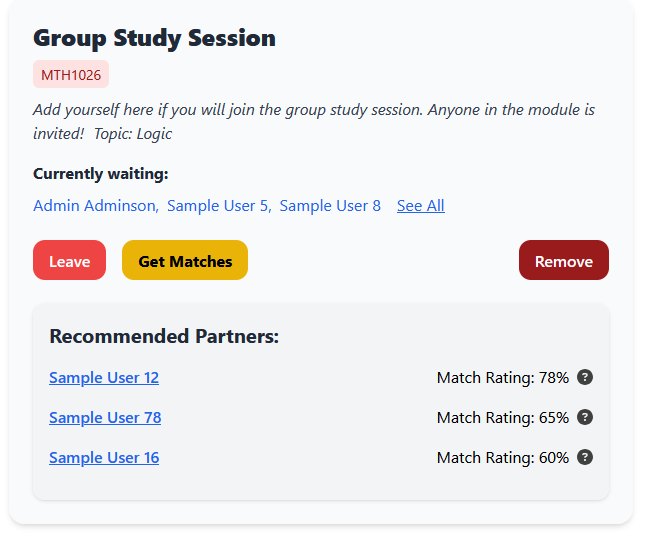
Figure 24: Joining a queue on CollegeGuide
4.4 Understanding the Matching System
The Partner Matcher uses a weighting system to match similar students based on the following information, with the percentages being how much they factor in:
- Roles: (30%)
- Skills: (25%)
- Interest: (20%)
- Engagement: (15%)
- Bio: (10%)
You can check the results and scores of your matching by clicking on the question mark icon next to the overall match rating.
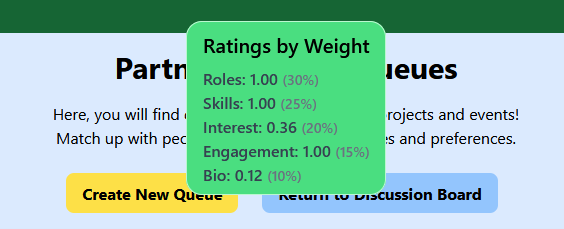
Figure 25: CollegeGuide Matching System
5.0 Viewing Your Profile
To view your profile, click on the user icon on the navigation bar. This will load up your profile page with all of your information, along with recent notes, advice queries and discussion threads that you have created.
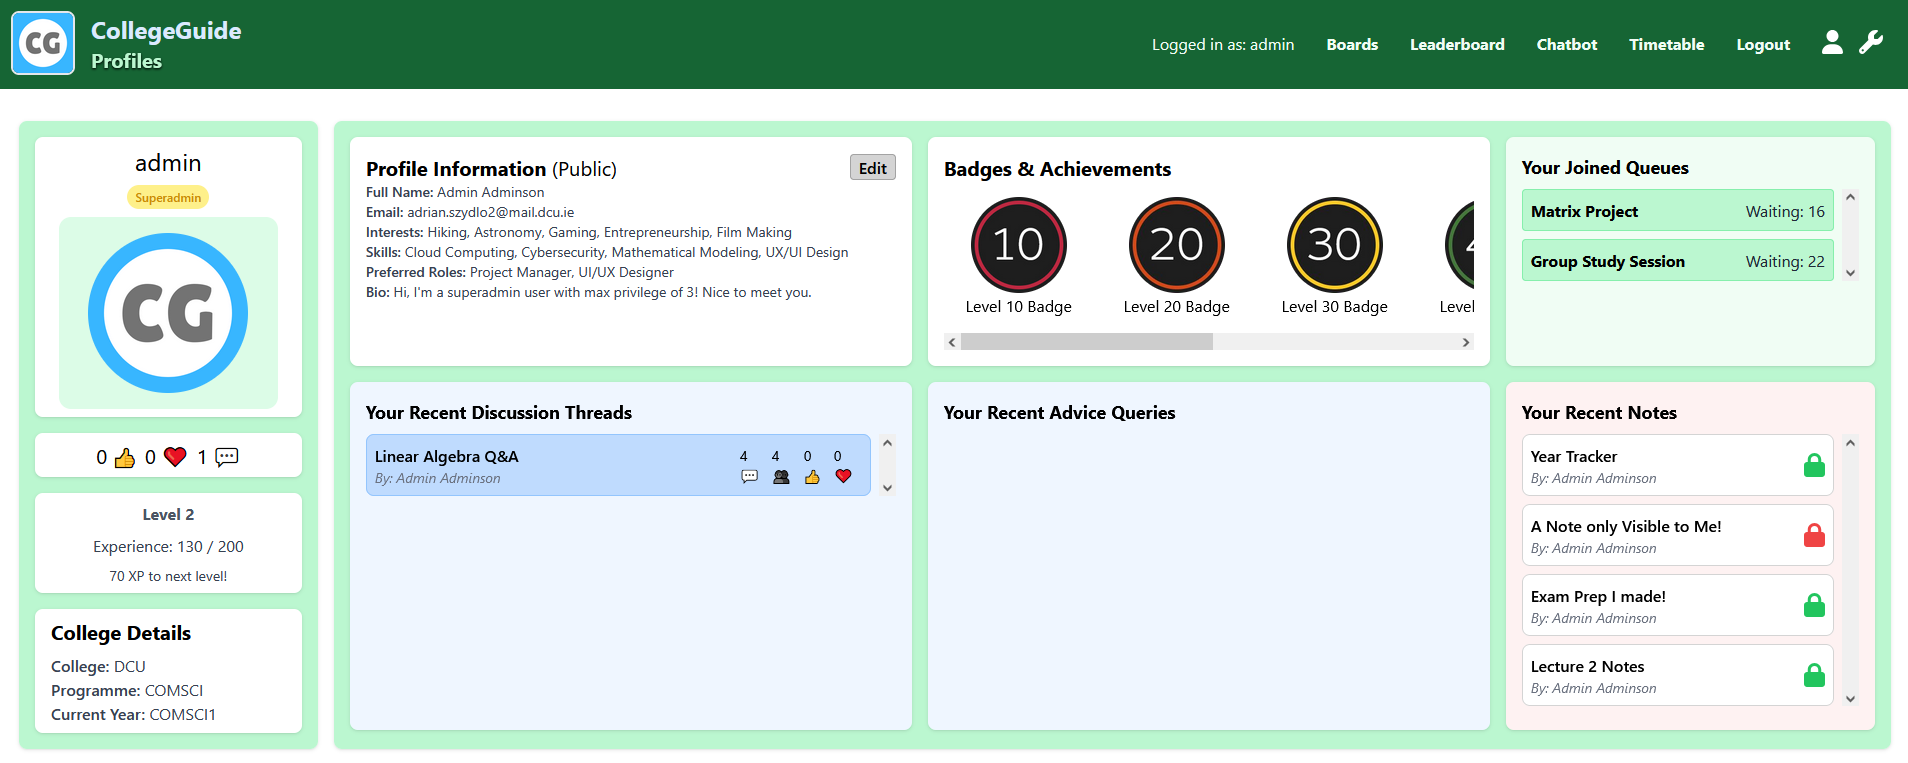
Figure 26: CollegeGuide Profile Page
5.1 Editing Your Profile
From your profile page, you can click on the Edit button inside the Profile Information box. This will display the same form that you filled out when you first created your profile, but this time it has been pre-filled with your information. Update the fields you want to change and click on Edit Profile to save your changes.
Note: If you would like to change your college or course information, you will need to contact the CollegeGuide admins, who can update that information via the admin dashboard.
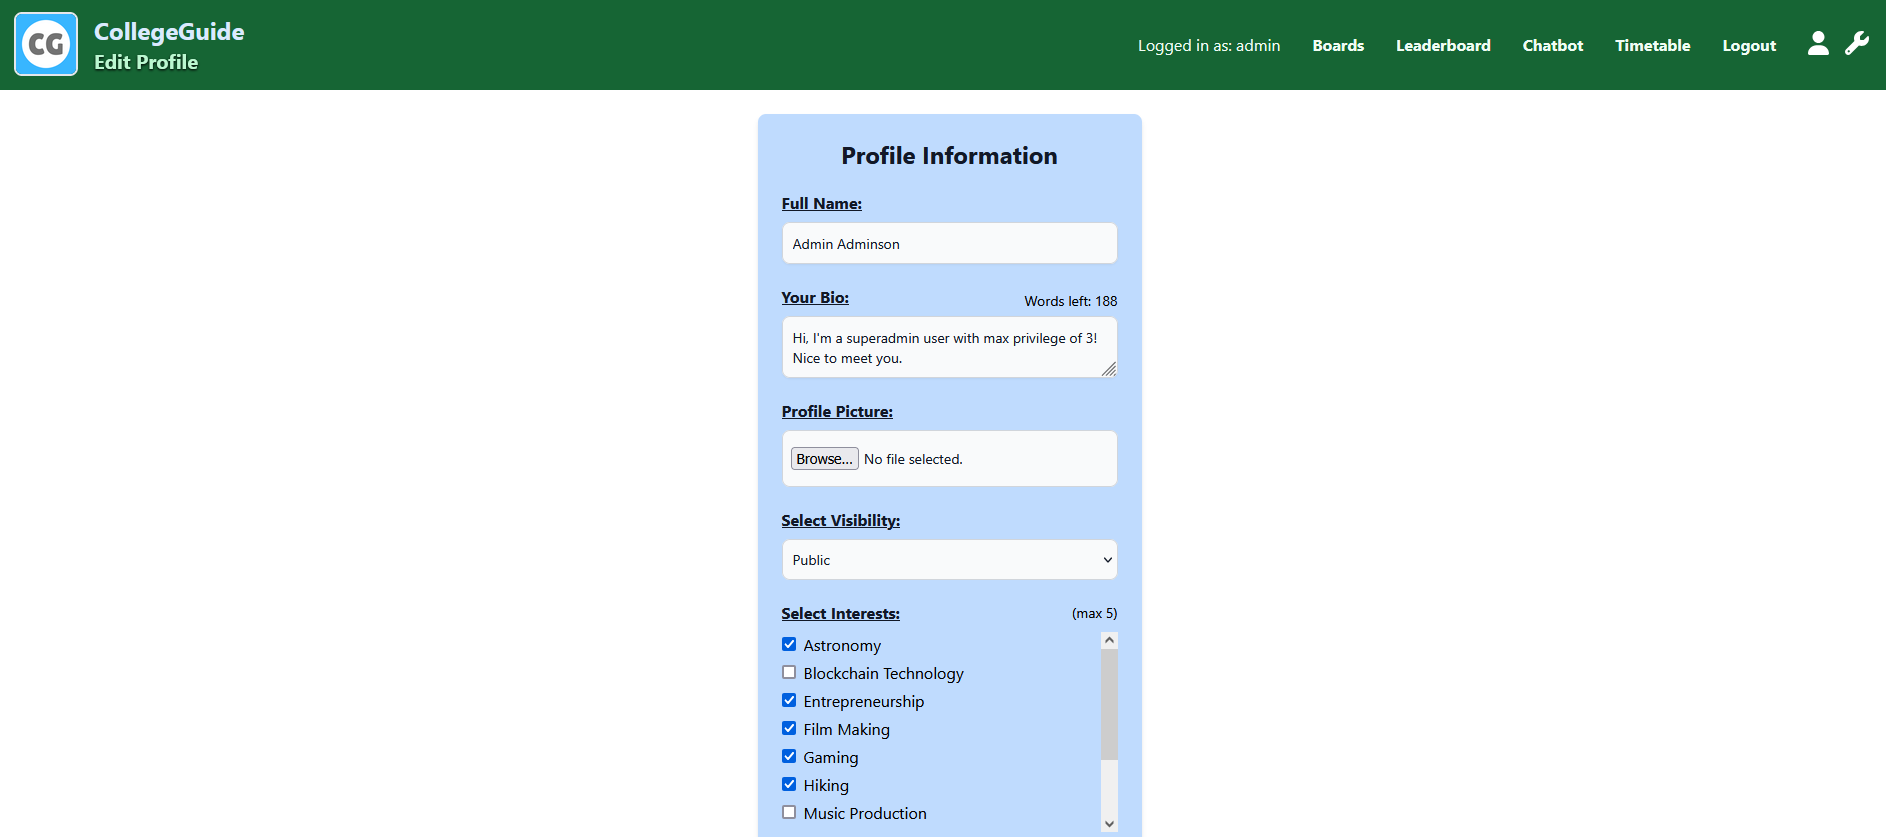
Figure 27: Editing your profile on CollegeGuide
5.2 Viewing the Leaderboard
To view the Leaderboard, click on the Leaderboard option in the navigation bar. (You do not need to be logged in for this) The leaderboard displays the most active users on CollegeGuide, sorted by their level and experience points. From here you can also view other student’s profiles, if they have set their visibility to public.
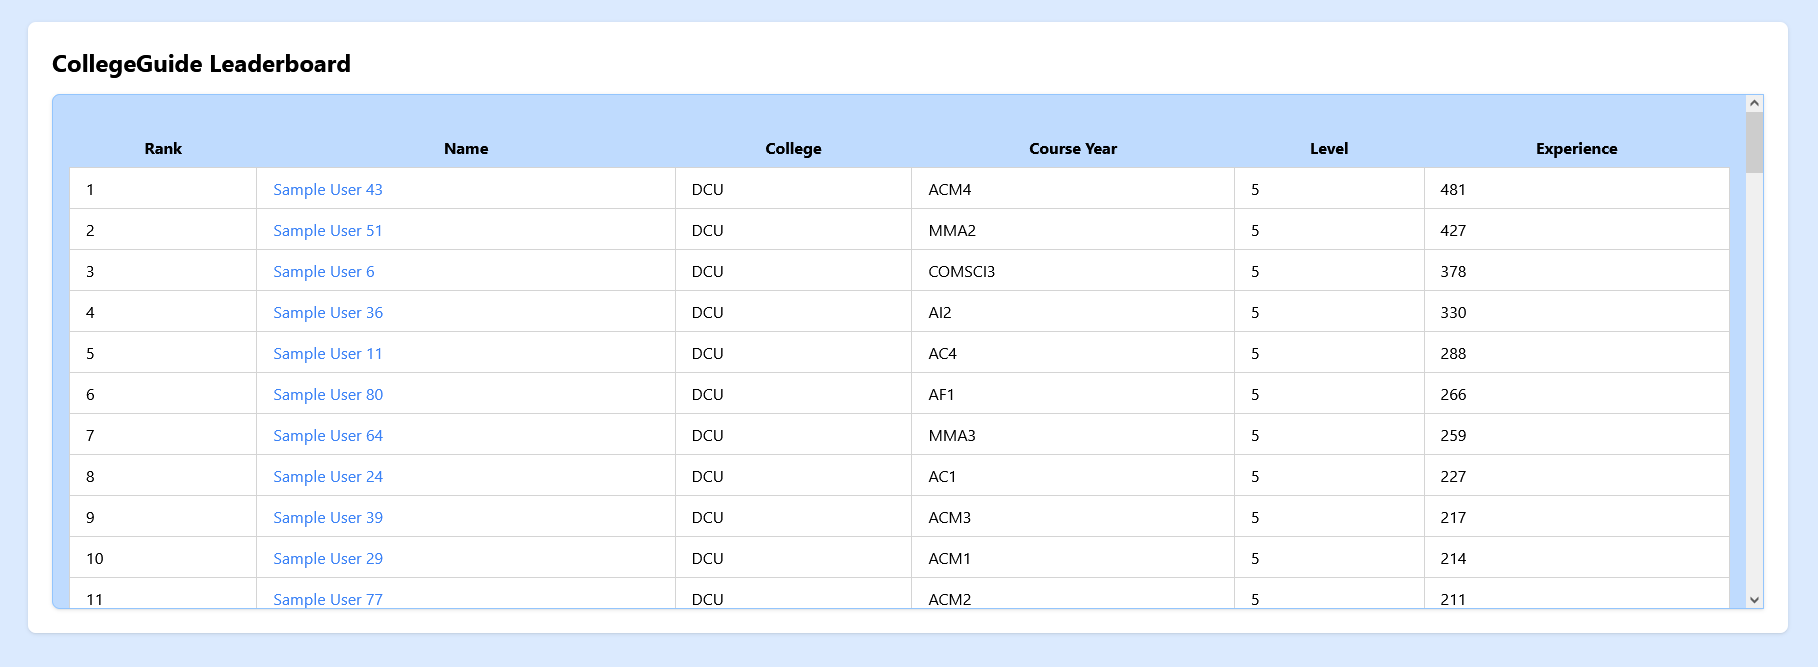
Figure 28: CollegeGuide Leaderboard
5.3 Viewing your Timetable
From the navigation bar, click on Timetable to open the page. This will display your timetable for the current week as per the year you selected in your profile setup. You can click on any module to be brought to it’s corresponding Community Board.
Note: Currently the timetable feature is only available for DCU students, but we plan to expand this to other colleges in the future.
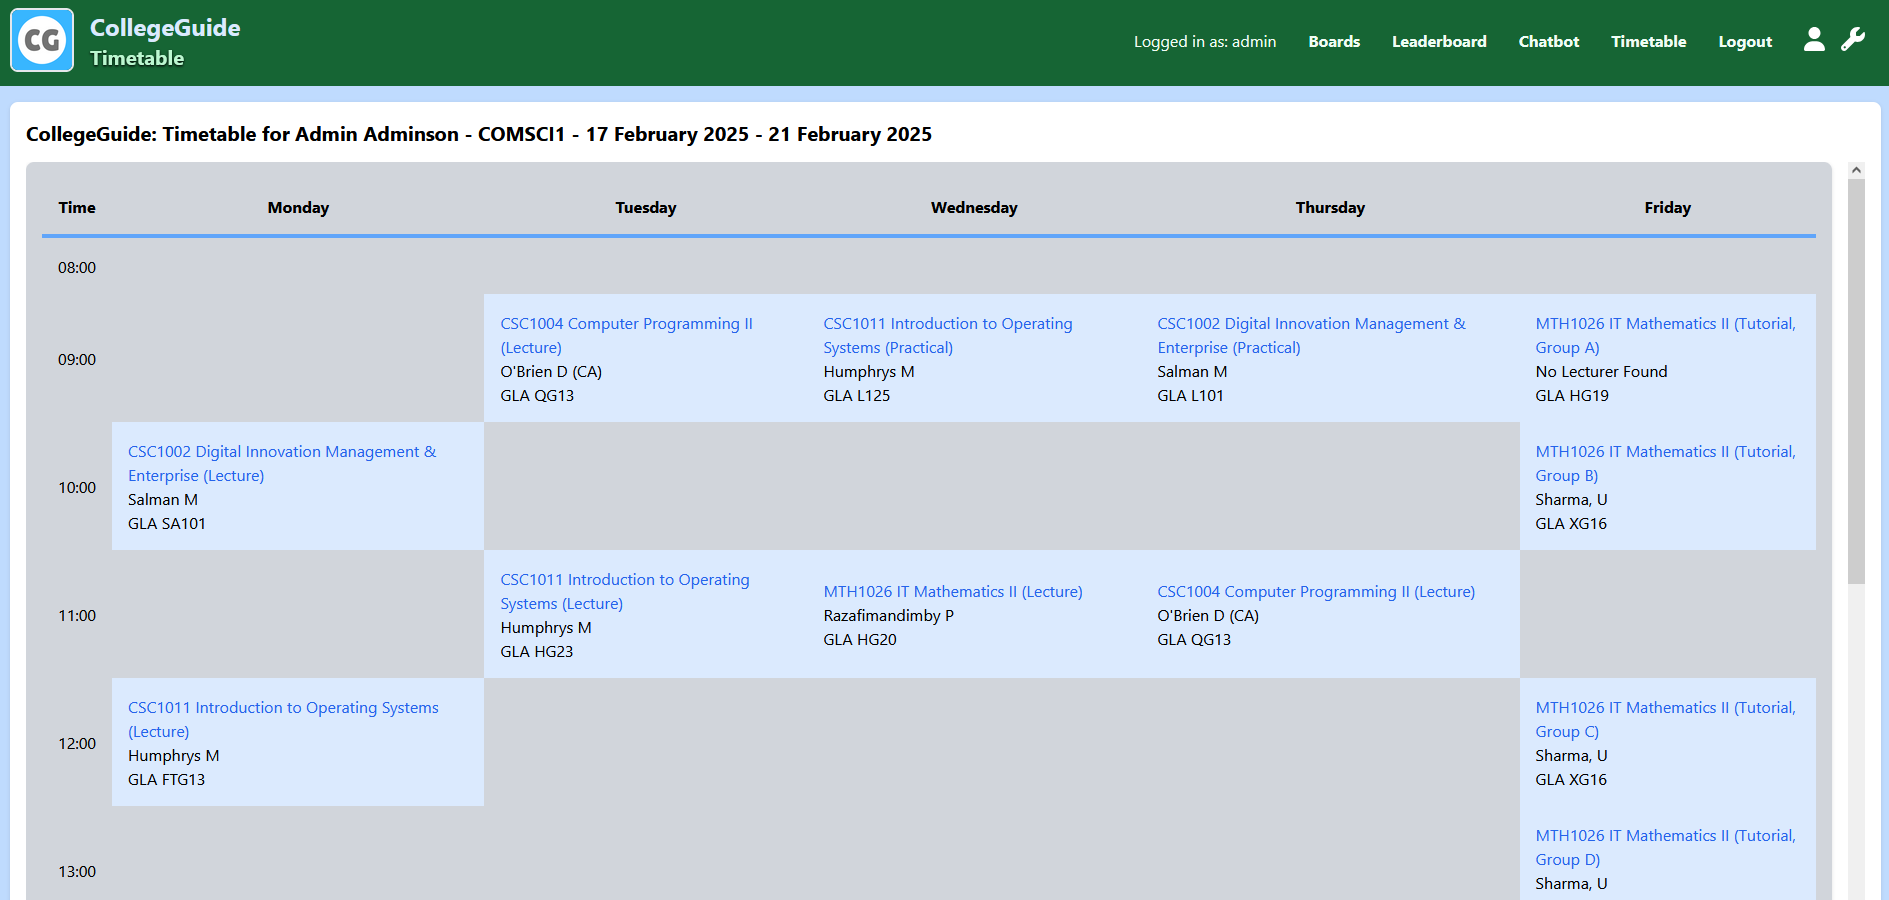
Figure 29: CollegeGuide Timetable
6.0 Using the Chatbot
Once logged in, click on chatbot from the navigation bar and then the Chatbot messaging UI will appear. Click on the text box below and start typing, once you are ready to ask it your question, click on the paper plane send button.
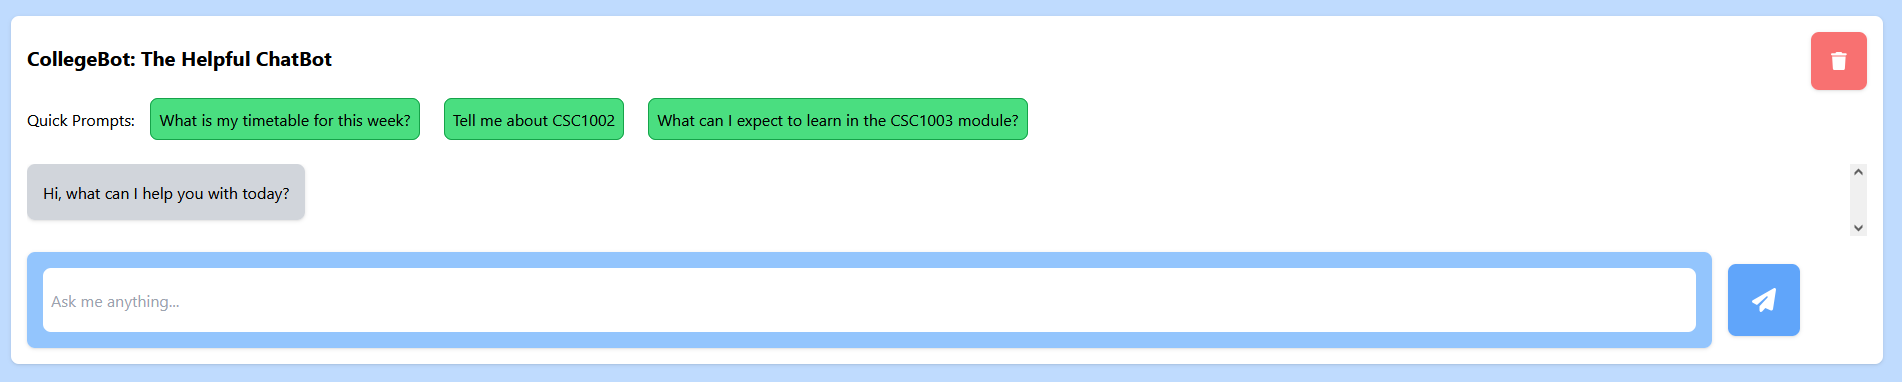
Figure 30: CollegeGuide Chatbot
6.1 Clearing your Chatbot History
The chatbot dynamically responds to your chat history, if you would like to clear it, you can do this at any time by clicking on the red bin icon in the top right corner of the chatbot interface. Your chatbot history will be cleared and you can start fresh.
6.2 Special Features
The chatbot is powered by the Groq Llama 3 model, which allows it to answer questions on a wide range of topics just like other chatbots you might find online. Depending on the key words you enter, the chatbot will query specific APIs and return the most relevant information.
- Timetable: If you ask the chatbot What is my timetable for this week?, it will respond with your timetable information, similar to the timetable page.
- Module Codes: If you enter a module code registered in CollegeGuide, the chatbot will answer with detailed information about the module, you can then ask follow up questions to learn more.
- Quick Prompts: Not suer what to ask? Just click on one of these to get a feel for how the chatbot works.
6.3 Example Chatbot Questions and Responses
What is my timetable for this week?
- The chatbot will respond with your personalised timetable for the current week based on the year you selected when creating your profile. This question can be automatically asked by clicking on the relevant Quick Prompt.
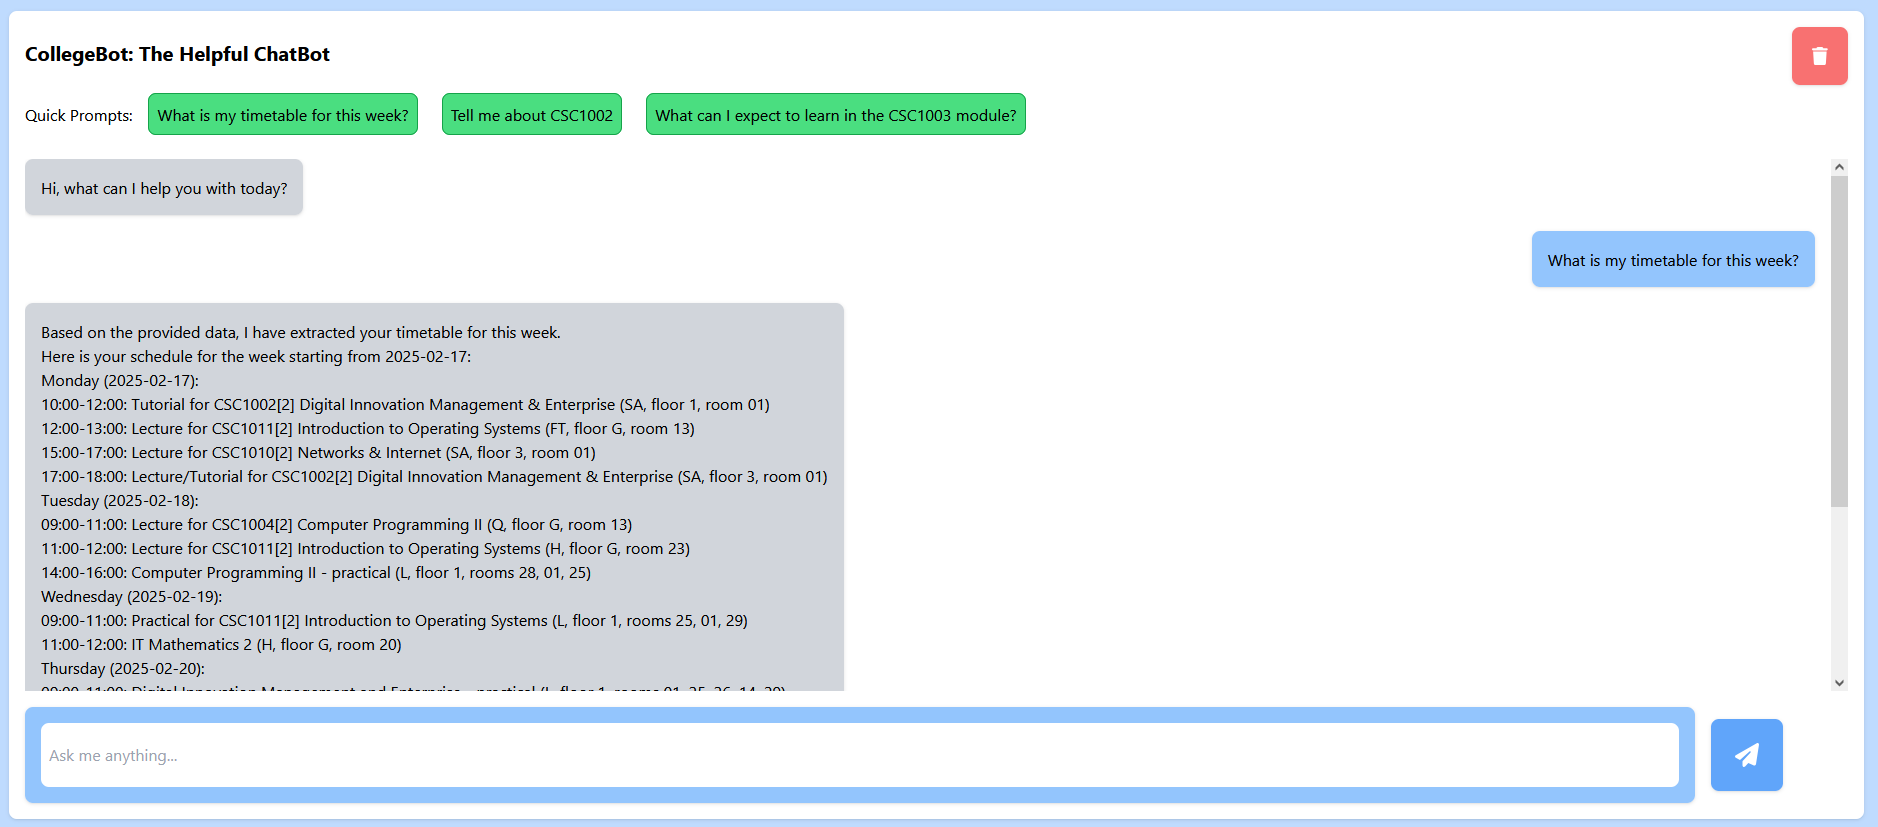
Figure 31: CollegeGuide Chatbot Timetable Response
Tell me about module code
- The chatbot will respond with detailed information about the module, including the module name, lecturer, and a brief description. You can ask it follow up information based on this query. The Quick Prompt button defaults to the first module in your registered course.
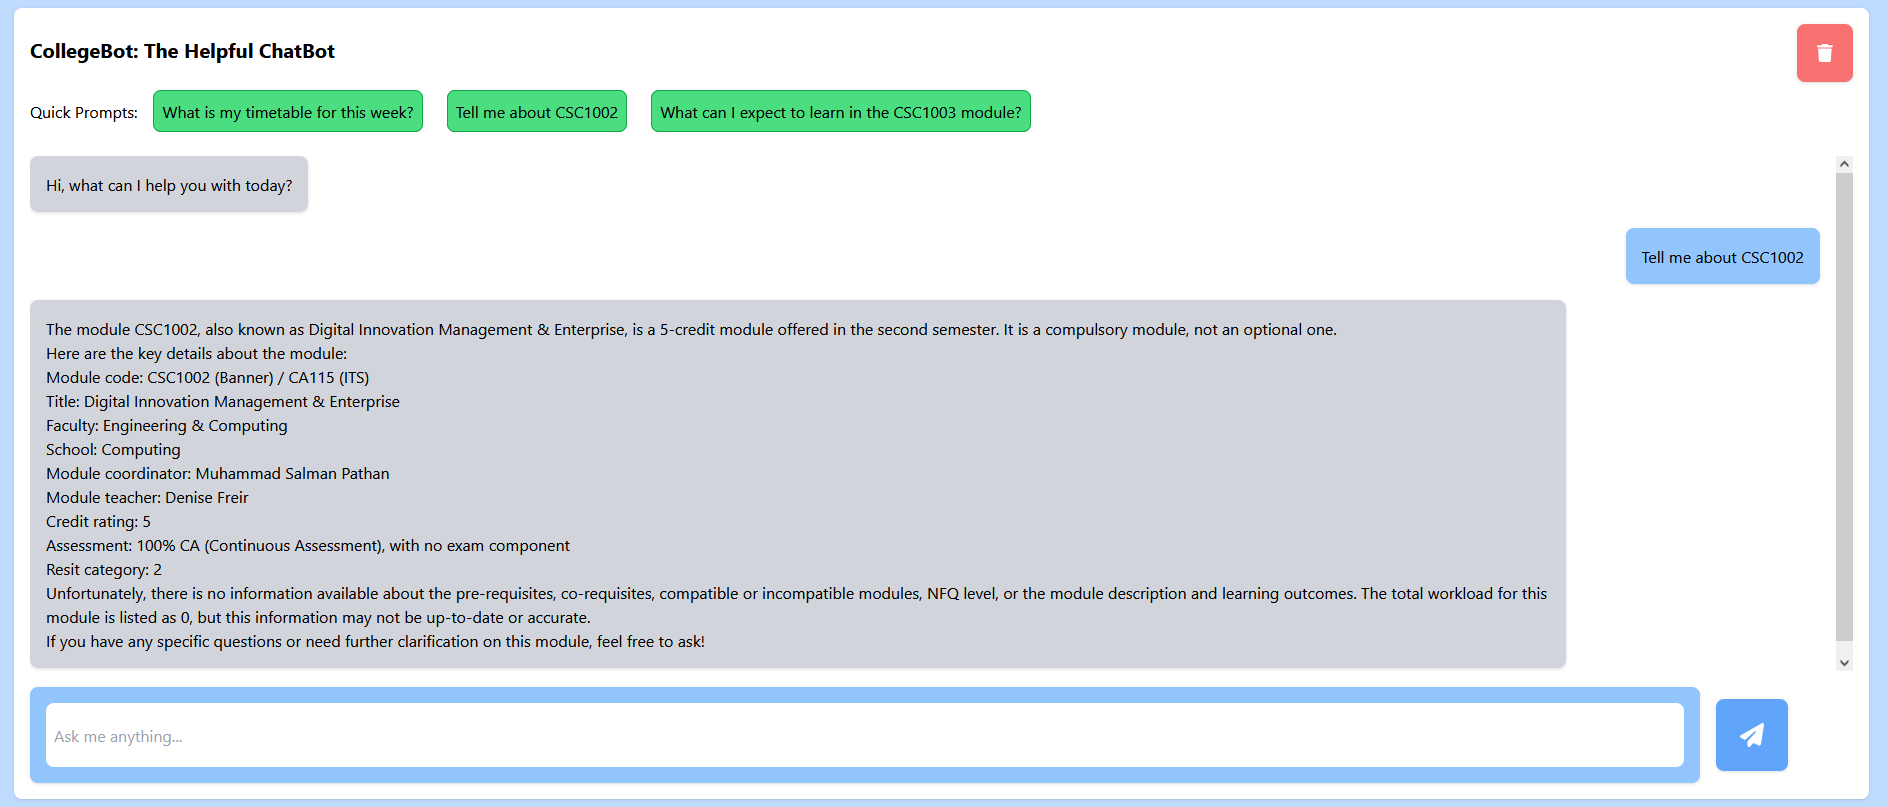
Figure 32: CollegeGuide Chatbot Module Code Response
What can I expect to learn in the module code module?
- The chatbot will respond with a brief description of the module and what you can expect to learn.
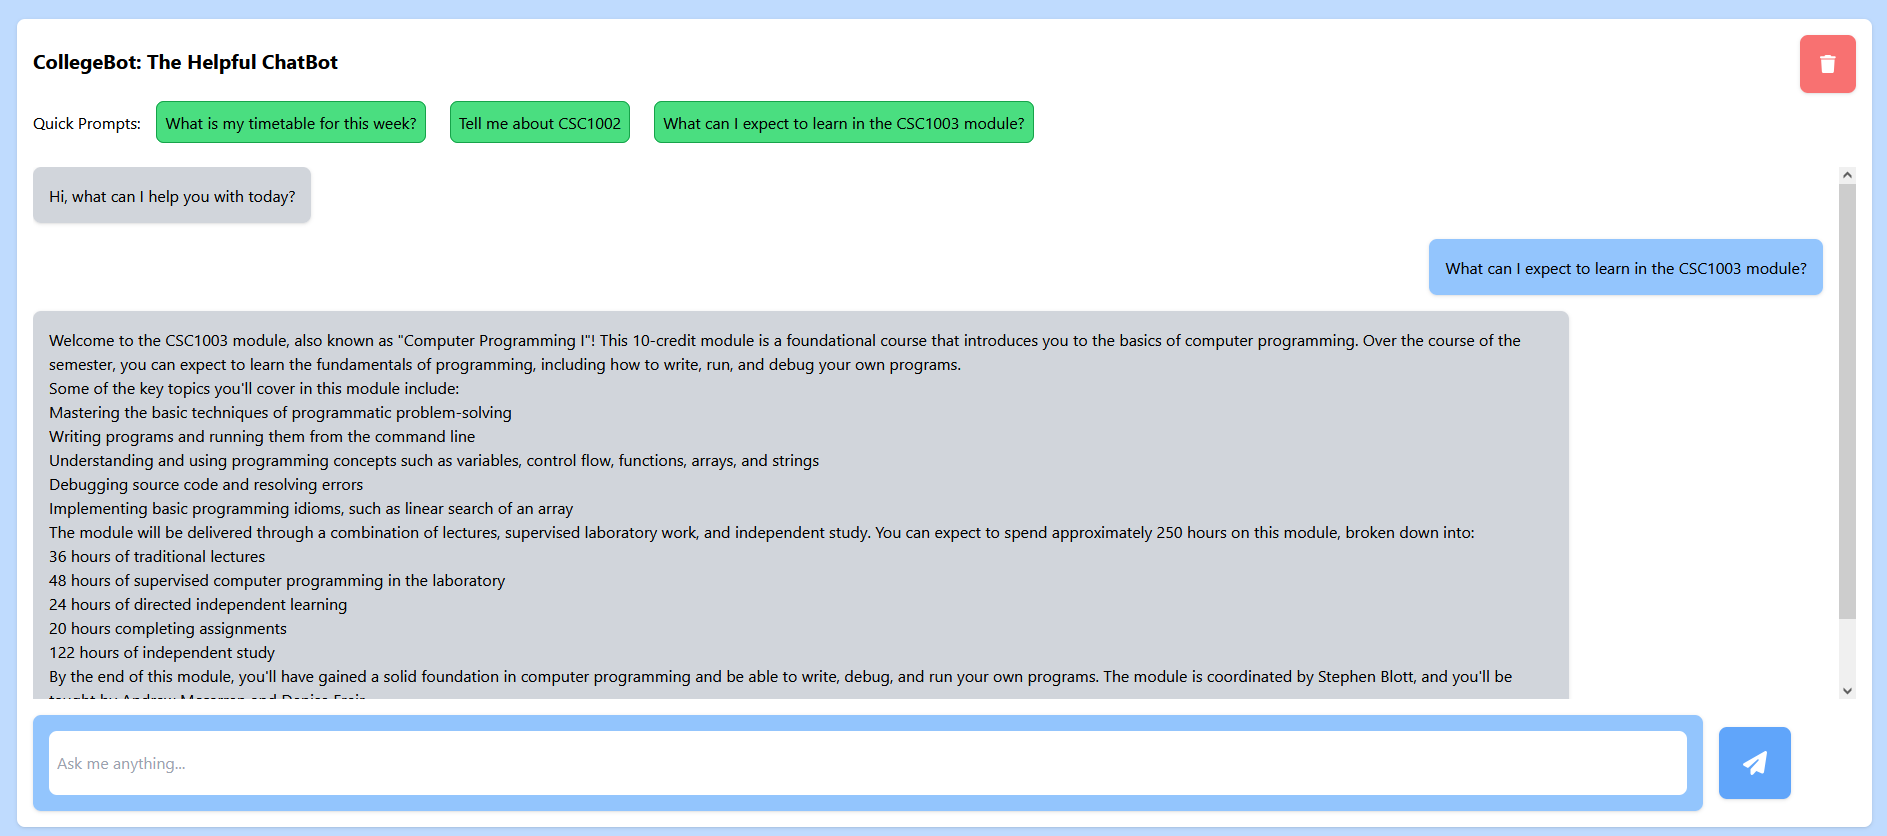
Figure 33: CollegeGuide Chatbot Module Code Learning Response
How does photosynthesis work?
- The chatbot is not limited to just CollegeGuide information, it can also answer general questions like this one. It will utilise the Groq Llama 3 model to return information relevant to the query.
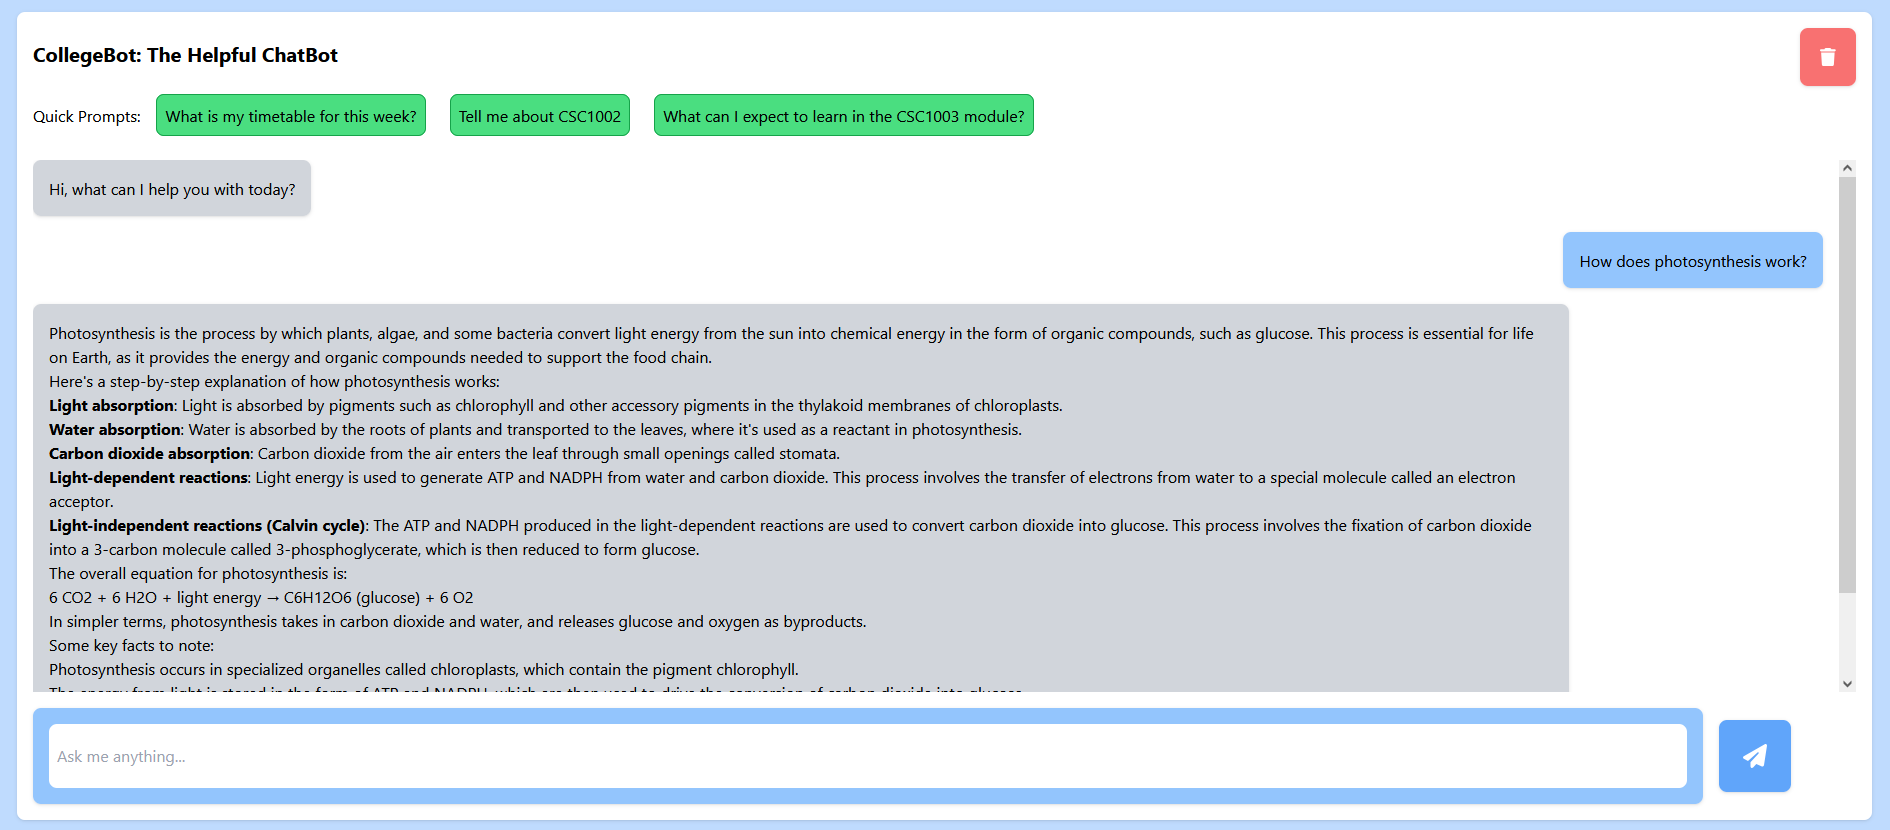
Figure 34: CollegeGuide Chatbot Photosynthesis Response
What is the workload like for the module code module?
- The chatbot will respond with information about the expected workload of a module, you will be able to see how many assignments, exams and lecture hours are expected in the module.
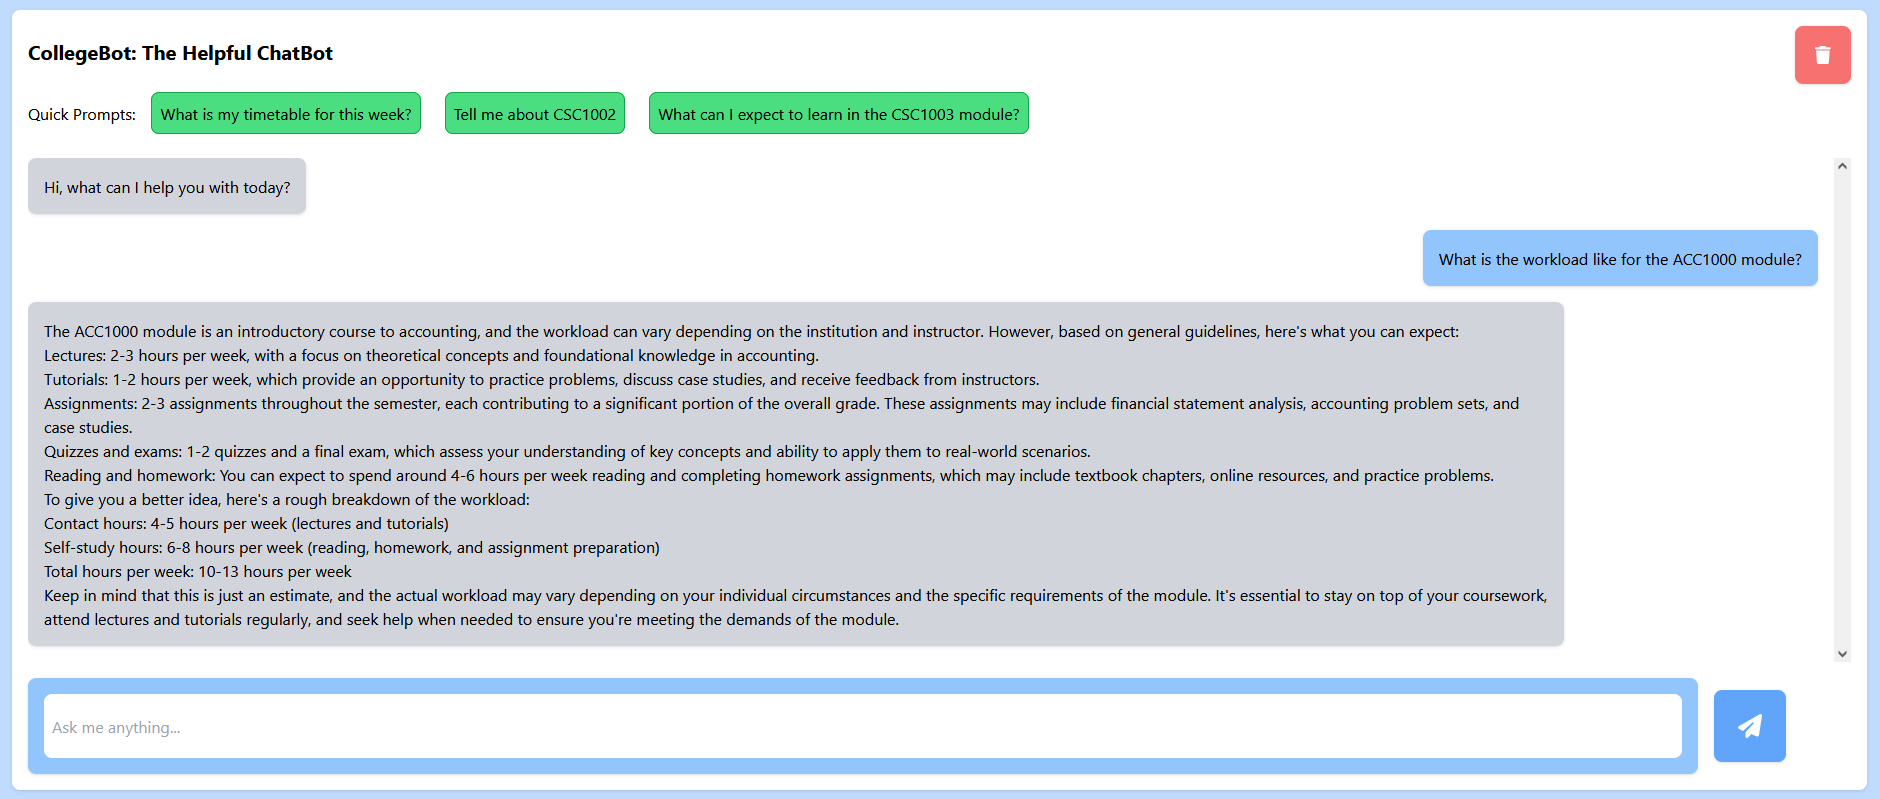
Figure 35: CollegeGuide Chatbot Workload Response
7.0 Accessing the Admin Dashboard
If you are logged in as an account that has admin privileges, you can access the admin dashboard by clicking on the wrench button in the navigation bar. Once inside you will be greeted with a list of profiles ordered by their user id.
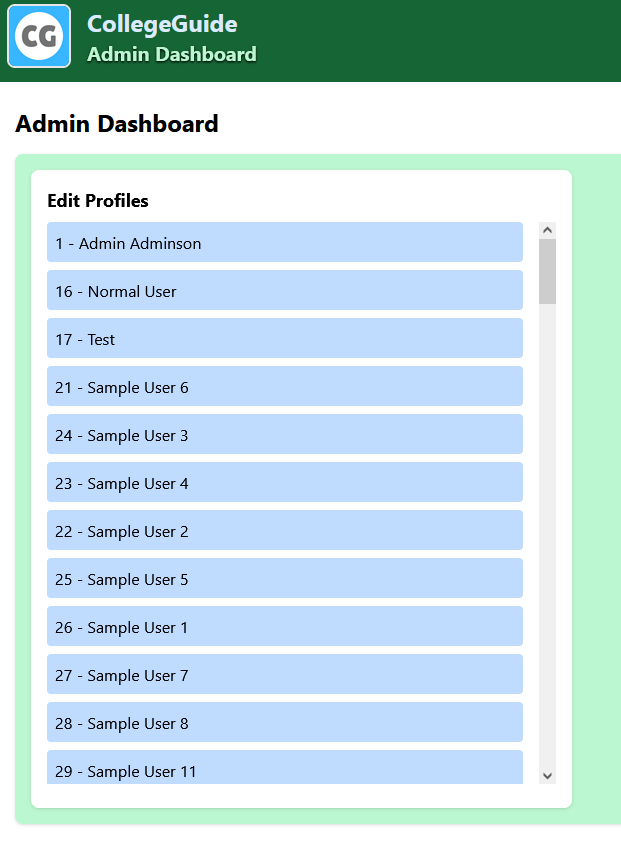
Figure 36: CollegeGuide Admin Dashboard
7.1 Modifying users in the Admin Dashboard
To update a user’s profile, click on them from the list and a form similar to the registration form will appear, with the user’s information filled out. If a user switches course and would like their profile updated, you can do this from here. Once you have made the changes, click on Edit profile to update the user.
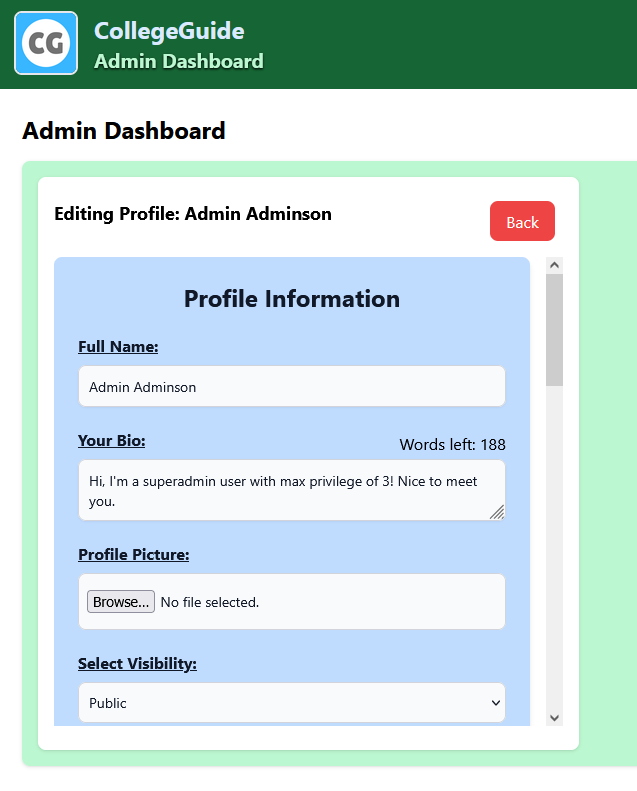
Figure 37: Editing a user’s profile on CollegeGuide
8. Appendices
If you have any questions that need further clarification, you can email us here:
- Adrian Szydlo: [email protected]
- Jake Farrell: [email protected]